Keras简介
Keras是一个高层神经网络API,Keras由纯python编写而成基于TensorFlow或Theano .Keras为支持快速实验而生,能够把你的idea迅速转换为结果,如果你有以下需求,请选择Keras:
- 简易和快速的原型设计(keras具有高度模块化,极简和可扩充性)
- 支持CNN和RNN,或者二者的结合
- 无缝CPU和GPU切换
keras适用的python版本是:Python 2.7-3.5
keras的设计原则是
- 用户友好:keras是为人类而不是外星人设计的API。keras提供一致而简洁的API,能够极大减少一般应用下用户的工作量,同时,keras提供清晰和具有实践意义的bug反馈。
- 模块性:模型可理解为一个层的序列或数据的运算图,完全可配置的模块可以用最少的代价自由组合在一起。具体而言,网络层、损失函数、优化器、初始化策略、激活函数、正则化方法都是独立的模块,你可以使用它们来构建自己的模型。
- 易扩展性:添加新模块超容易,只需要仿照现有的模块编写新的类或函数即可。
- 与python协作:Keras没有单独的模型配置文件类型(作为对比,caffee,模型由python代码描述,使其更紧凑和更容易debug,并提供了扩展的便利性。
一些基本概念
张量
张量,或tensor,是本文档中会经常出现的一个词汇,再次稍作解释。
使用这个词汇的目的是为了表述统一,张量可以看作是向量、矩阵的自然推广,我们用张量来广泛的数据类型。
规模最小的张量是0阶张量,即标量,也就是一个数。当我们把一些数有序的排列起来,就形成了1阶张量,也就是一个向量。
张量的阶数有时候也称为维度,或者轴,轴这个词翻译自英文axis。例如一个矩阵[[1,2],[3,4]],是一个2阶张量,有两个维度或轴,沿着第0个轴你看到的是[1,2],[3,4]两个向量,沿着第1个轴你看到的是[1,3],[2,4]两个向量。
batch
深度学习的优化算法,说白了就是梯度下降。每次的参数更新有两种方式。
第一种,遍历全部数据集算一次损失函数,然后算函数对各个参数的梯度,更新梯度。这种方法每更新一次参数都要把数据集里的所有样本都看一遍,计算量开销大,计算速度慢,不支持在线学习,称为批梯度下降。
另一种,每看一个数据就算一下损失函数,然后求梯度跟新参数,这个称为随机梯度下降。这个方法速度比较快,但是收敛性能不太好,可能在最优点附近晃来晃去,hit不到最优点。两次参数的更新也有可能互相抵消掉,造成目标函数震荡的比较剧烈。
为了克服两种方法的缺点,现在一般采用的是一种折中手段,mini-batch gradient decent,小批的梯度下降,这种方法把数据分为若干个批,按批来更新参数,这样,一个批中的一组数据共同决定了本次梯度的方向,下降起来就不容易跑偏,计算量也不是很大。
顺便说一句,Keras中用的优化器SGD是stochastic gradient descent的缩写,但不代表是一个样本就更新一回,还是基于mini-batch的。
epochs
epochs指的是训练过程中数据被“轮”多少次,就这样。
快速开始:30s上手keras
keras的核心数据结构是“模型”,模型是一种组织网络层的方式。Keras中主要模型是Sequential模型,Sequential是一系列网络层按顺序构成的栈.
Sequential模型如下
from keras.models import Sequential
model = Sequential()
将一些网络层通过.add()堆叠起来,就构成了一个模型:
from keras.layers import Dense, Activation
model.add(Dense(units=64, input_dim=100))
model.add(Activation("relu"))
model.add(Dense(units=10))
model.add(Activation("softmax"))
完成模型的搭建后,我们需要使用.compile()方法来编译模型:
model.compile(loss='categorical_crossentropy', optimizer='sgd', metrics=['accuracy'])
编译模型时必须指明损失函数和优化器,如果你需要的话,也可以自己定制损失函数。Keras的一个核心理念就是简明易用同时,保证用户对Keras的绝对控制力度,用户可以根据自己的需要定制自己的模型、网络层、甚至修改源代码。
from keras.optimizers import SGD
model.compile(loss='categorical_crossentropy', optimizer=SGD(lr=0.01, momentum=0.9, nesterov=True))
完成模型编译后,我们在训练数据上按batch进行一定次数的迭代来训练网络
model.fit(x_train, y_train, epochs=5, batch_size=32)
当然,我们也可以手动一个个batch的数据送入网络中训练,这时候需要使用:
model.train_on_batch(x_batch, y_batch)
随后,我们可以使用一行代码对我们的模型进行评估,看看模型的指标是否满足我们的要求:
loss_and_metrics = model.evaluate(x_test, y_test, batch_size=128)
或者,我们可以使用我们的模型,对新的数据进行预测
classes = model.predict(x_test, batch_size=128)
序贯(Sequential)模型
接下来我们就开始介绍上文提到的序贯模型。序贯模型是多个网络层的线性堆叠,也就是“一条道走到黑”。
可以通过向Sequential模型传递一个layer的list来构造该模型:
from keras.models import Sequential
from keras.layers import Dense, Activation
model = Sequential([Dense(32, units=784),Activation('relu'),Dense(10),
Activation('softmax'),])
也可以通过.add()方法一个个的将layer加入模型中:
model = Sequential()
model.add(Dense(32, input_shape=(784,)))
model.add(Activation('relu'))
指定输入数据的shape
模型需要知道输入数据的shape,因此,Sequential的第一层需要接受一个关于输入数据shape的参数,后面的各个层则可以自动地推导出中间数据的shape,因为不需要为每个层都指定这个参数。有几种方法来为第一层指定输入数据的shape
- 传递一个input_shape的关键字参数给第一层,input_shape是一个tuple类型的数据,其中也可以填入none,如果填入None则表示此位置可能是任何正整数。数据的batch大小不应包含在其中。
- 有些2D层,如Dense,支持通过指定其输入维度inout_dim来隐含的指定输入数据shape。一些3D的时域层支持通过参数input_dim和input_length来指定输入shape。
- 如果你需要为输入指定一个固定大小的batch_size(常用于stateful RNN网络),可以传递batch_size参数到一个层中,例如你想指定输入张量的batch大小是32,数据shape是(6,8),则你需要传递batch_size=32和input_shape=(6,8)。
model = Sequential()
model.add(Dense(32, input_dim=784))
model = Sequential()
model.add(Dense(32, input_shape=784))
编译
在训练模型之前,我们需要通过compile来对学习过程进行配置。compile接收三个参数:
- 优化器optimizer:该参数可指定为已预定义的优化器名,如rmsprop、adagrad,或一个optimizer类的对象。
- 损失函数loss:该参数为模型试图最小化的目标函数,它可为预定义的损失函数名。如categorical_crossentropy、mse,也可以为一个损失函数。
- 指标列表metrics:对分类问题,我们一般将该列表设置为metrics=[‘accuracy’]。指标可以是一个预定义指标的名字,也可以是一个用户定制的函数。指标函数应该返回单个张量,或一个完成metric_name - > metric_value。
# For a multi-class classification problem
model.compile(optimizer='rmsprop',
              loss='categorical_crossentropy',
              metrics=['accuracy'])
# For a binary classification problem
model.compile(optimizer='rmsprop',
              loss='binary_crossentropy',
             metrics=['accuracy'])
# For a mean squared error regression problem
model.compile(optimizer='rmsprop',
              loss='mse')
# For custom metrics
import keras.backend as K
def mean_pred(y_true, y_pred):
    return K.mean(y_pred)

model.compile(optimizer='rmsprop',
              loss='binary_crossentropy',
              metrics=['accuracy', mean_pred])
训练
Keras以Numpy数组作为输入数据和标签的数据类型。训练模型一般使用fit函数,
# For a single-input model with 2 classes (binary classification):
model = Sequential()
model.add(Dense(32, activation='relu', input_dim=100))
model.add(Dense(1, activation='sigmoid'))
model.compile(optimizer='rmsprop',
              loss='binary_crossentropy',
              metrics=['accuracy'])

# Generate dummy data
import numpy as np
data = np.random.random((1000, 100))
labels = np.random.randint(2, size=(1000, 1))

# Train the model, iterating on the data in batches of 32 samples
model.fit(data, labels, epochs=10, batch_size=32)
例子
在keras代码包的examples文件中,你将找到使用真实数据的示例模型:
- CIFAR10 小图片分类:使用CNN和实时数据提升
- IMDB 电影评论观点分类:使用LSTM处理成序列的词语
- Reuters(路透社)新闻主题分类:使用多层感知器(MLP)
- MNIST手写数字识别:使用多层感知器和CNN
- 字符级文本生成:使用LSTM …
基于多层感知器的softmax多分类
from keras.models import Sequential
from keras.layers import Dense, Dropout, Activation
from keras.optimizers import SGD

# Generate dummy data
import numpy as np
x_train = np.random.random((1000, 20))
y_train = keras.utils.to_categorical(np.random.randint(10, size=(1000, 1)), num_classes=10)
x_test = np.random.random((100, 20))
y_test = keras.utils.to_categorical(np.random.randint(10, size=(100, 1)), num_classes=10)

model = Sequential()
# Dense(64) is a fully-connected layer with 64 hidden units.
# in the first layer, you must specify the expected input data shape:
# here, 20-dimensional vectors.
model.add(Dense(64, activation='relu', input_dim=20))
model.add(Dropout(0.5))
model.add(Dense(64, activation='relu'))
model.add(Dropout(0.5))
model.add(Dense(10, activation='softmax'))

sgd = SGD(lr=0.01, decay=1e-6, momentum=0.9, nesterov=True)
model.compile(loss='categorical_crossentropy',
              optimizer=sgd,
              metrics=['accuracy'])

model.fit(x_train, y_train,
          epochs=20,
          batch_size=128)
score = model.evaluate(x_test, y_test, batch_size=128)
MLP的二分类
import numpy as np
from keras.models import Sequential
from keras.layers import Dense, Dropout

# Generate dummy data
x_train = np.random.random((1000, 20))
y_train = np.random.randint(2, size=(1000, 1))
x_test = np.random.random((100, 20))
y_test = np.random.randint(2, size=(100, 1))

model = Sequential()
model.add(Dense(64, input_dim=20, activation='relu'))
model.add(Dropout(0.5))
model.add(Dense(64, activation='relu'))
model.add(Dropout(0.5))
model.add(Dense(1, activation='sigmoid'))

model.compile(loss='binary_crossentropy',
              optimizer='rmsprop',
              metrics=['accuracy'])
model.fit(x_train, y_train,
          epochs=20,
          batch_size=128)
score = model.evaluate(x_test, y_test, batch_size=128)
序贯模型API
常用Sequential属性
- model.layers是添加到模型上层的list
Sequentaial模型方法
add
add(self,layer)
向模型中添加一个层
- layer:Layer对象
pop
pop(self)
弹出模型的最后一层,无返回值
compile
compile(self, optimizer, loss, metrics=None, sample_weight_mode=None)
编译用来来配置模型的学习过程,其参数有
- optimizer::字符串(预定义优化器名)或优化器对象
- loss:字符串(预定义损失函数名)或目标函数
- metrics:列表,包含评估模型在训练和测试时的网络性能的指标,典型用法是
metrics=['accuracy'] - sample_weight_mode:如果你需要按时间步为样本赋权(2D权矩阵),将该值设为“temporal”。默认为“None”,代表按样本赋权(1D权)。在下面
fit函数的解释中有相关的参考内容。 - kwargs:使用TensorFlow作为后端请忽略该参数,若使用Theano作为后端,kwargs的值将会传递给 K.function
model = Sequential()
model.add(Dense(32, input_shape=(500,)))
model.add(Dense(10, activation='softmax'))
model.compile(optimizer='rmsprop',
      loss='categorical_crossentropy',
      metrics=['accuracy'])
模型在使用前必须编译,否则在调用fit或evaluate时会抛出异常。
fit
fit(self, x, y, batch_size=32, epochs=10, verbose=1)
本函数将模型训练nb_epoch轮,其参数有:
- x:输入数据。如果模型只有一个输入,那么x的类型是numpy array,如果模型有多个输入,那么x的类型应当为list,list的元素是对应于各个输入的numpy array
- y:标签,numpy array
- batch_size:整数,指定进行梯度下降时每个batch包含的样本数。训练时一个batch的样本会被计算一次梯度下降,使目标函数优化一步。
- epochs:整数,训练的轮数,每个epoch会把训练集轮一遍。
- verbose:日志显示,0为不在标准输出流输出日志信息,1为输出进度条记录,2为每个epoch输出一行记录
evaluate
evaluate(self, x, y, batch_size=32, verbose=1, sample_weight=None)
本函数按batch计算在某些输入数据上模型的误差,其参数有:
- x:输入数据,与fit一样,是numpy array或numpy array的list
- y:标签,numpy array
- batch_size:整数,含义同fit的同名参数
- verbose:含义同fit的同名参数,但只能取0或1
- sample_weight:numpy array,含义同fit的同名参数
predict
predict(self, x, batch_size=32, verbose=0)
本函数按batch获得输入数据对应的输出,其参数有:
函数的返回值的预测值的numpy array。
函数式(Functional)模型
我们起初将Functional一词译作泛型,想要表达该类模型能够表达任意张量映射的含义,但表达的表示很精确,在Keras2里我们将这个词改译为“函数式”,对函数式编程有所了解的同学应该能够快速get该类模型想要表达的含义。函数式模型称作为Functional,但它的类名是Model,因此我们有时候也用Model来代表函数式模型。
Keras函数式模型接口是用户定义多输出模型、非循环有向模型或具有共享层的模型等复杂模型的途径。一句话,只要你的模型不是类似VGG一样一条路走到height的模型,或者你的模型需要多余一个的输出,那么你总应该选择函数式模型。函数式模型是最广泛的一类模型,序贯模型(sequential)只是它的一种特殊情况。
第一个模型:全连接网络
Sequential当然是实现全连接网络的最好方式,但我们从简单的全连接网络开始,有助于我们学习者部分的内容。在开始前,有几个概念需要澄清:
- 层对象接受张量为参数,返回一个张量。
- 输入是张量,输出也是张量的一个框架就是一个模型,通过Model定义。
- 这样的模型可以被像Keras的Sequential一样被训练。
from keras.layers import Input, Dense
from keras.models import Model

# This returns a tensor
inputs = Input(shape=(784,))

# a layer instance is callable on a tensor, and returns a tensor
x = Dense(64, activation='relu')(inputs)
x = Dense(64, activation='relu')(x)
predictions = Dense(10, activation='softmax')(x)

# This creates a model that includes
# the Input layer and three Dense layers
model = Model(inputs=inputs, outputs=predictions)
model.compile(optimizer='rmsprop',
              loss='categorical_crossentropy',
              metrics=['accuracy'])
model.fit(data, labels)  # starts training
所有的模型都是可调用的,就像层一样
利用函数式模型的接口,我们可以很容易的重用已经训练好的模型:你可以把模型当做一个层一样,通过提供一个tensor来调用它。
x = Input(shape=(784,))
# This works, and returns the 10-way softmax we defined above.
y = model(x)
这种方式可以允许你快速的创建能处理序列信号的模型,你可以很快将一个图像分类的模型变为一个对视频分类的模型,只需要一行代码:
from keras.layers import TimeDistributed

# Input tensor for sequences of 20 timesteps,
# each containing a 784-dimensional vector
input_sequences = Input(shape=(20, 784))

# This applies our previous model to every timestep in the input sequences.
# the output of the previous model was a 10-way softmax,
# so the output of the layer below will be a sequence of 20 vectors of size 10.
processed_sequences = TimeDistributed(model)(input_sequences)
多输入和多出输出模型
使用函数式模型的一个典型场景是搭建多输入、多输出的模型。
考虑这样一个模型。我们希望预测Twitter上一条新闻会被转发和点赞多少次。模型的主要输入是新闻本身,也就是一个词语的序列。但是我们可以拥有额外的输入、如新闻的发布日期等。这个模型的损失函数将由两部分组成,辅助的损失函数评估仅仅基于新闻本身作出预测的情况,主要损失函数评估基于新闻和额外信息的预测情况,即使来自主损失函数的梯度发生弥散,来自辅助损失函数的信息也能够训练Embedding和LSTM层。在模型中早点使用主要的损失函数式对于深度网络的一个良好的正则方法。总而言之,该模型框图如下:
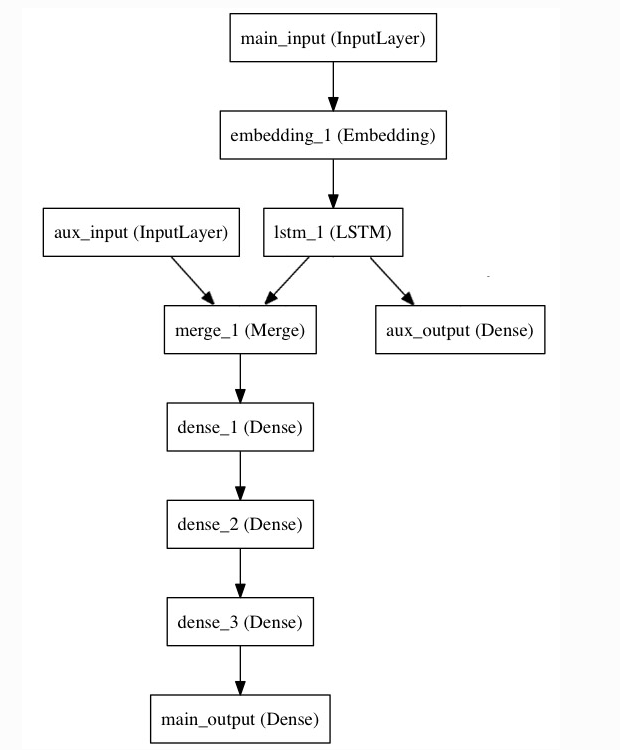
让我们用函数式模型来实现这个框图
主要的输入接收新闻本身,即一个整数的序列(每个整数编码了一个词)。这些整数位于1到10000之间(即我们的字典有10000个词)。这个序列有100个单词。
from keras.layers import Input, Embedding, LSTM, Dense
from keras.models import Model

# Headline input: meant to receive sequences of 100 integers, between 1 and 10000.
# Note that we can name any layer by passing it a "name" argument.
main_input = Input(shape=(100,), dtype='int32', name='main_input')

# This embedding layer will encode the input sequence
# into a sequence of dense 512-dimensional vectors.
x = Embedding(output_dim=512, input_dim=10000, input_length=100)(main_input)

# A LSTM will transform the vector sequence into a single vector,
# containing information about the entire sequence
lstm_out = LSTM(32)(x)
然后,我们插入一个额外的损失,使得即使在主损失很高的情况下,LSTM和Embedding层也可以平滑的训练
auxiliary_output = Dense(1, activation='sigmoid', name='aux_output')(lstm_out)
再然后,我们将LSTM与额外的输入数据串联起来组成输入,送入模型中:
auxiliary_input = Input(shape=(5,), name='aux_input')
x = keras.layers.concatenate([lstm_out, auxiliary_input])

# We stack a deep densely-connected network on top
x = Dense(64, activation='relu')(x)
x = Dense(64, activation='relu')(x)
x = Dense(64, activation='relu')(x)

# And finally we add the main logistic regression layer
main_output = Dense(1, activation='sigmoid', name='main_output')(x)
最后,我们定义整个2输入、2输出的模型:
model = Model(inputs=[main_input, auxiliary_input], outputs=[main_output, auxiliary_output])
模型定义完毕,下一步编译,我们给额外的损失赋0.2的权重。我们可以通过关键字参数loss_weights或loss来为不同的输出设置不同的损失函数或权值。这两个参数均可为python的列表或字典。这里我们给loss传递单个损失函数,这个损失函数会被应用于所有的输出上。
model.compile(optimizer='rmsprop', loss='binary_crossentropy',loss_weights=[1., 0.2])
编译完成后,我们通过传递训练数据和目标值训练该模型:
model.fit([headline_data, additional_data], [labels, labels],
          epochs=50, batch_size=32)
因为我们输入和输出是被命名过的(在定义时传递了“name”参数),我们也可以用下面的方式编译和训练模型:
model.compile(optimizer='rmsprop',
              loss={'main_output': 'binary_crossentropy', 'aux_output': 'binary_crossentropy'},
              loss_weights={'main_output': 1., 'aux_output': 0.2})

# And trained it via:
model.fit({'main_input': headline_data, 'aux_input': additional_data},
          {'main_output': labels, 'aux_output': labels},
          epochs=50, batch_size=32)
共享层
另一个使用函数式模型的场合是使用共享层的时候。
考虑微博数据,我们希望建立模型来判别两条微博是否来自同一个用户,这个需求同样可以用来判别一个用户的两条微博的相似性。
一种实现方式是:我们建立一个模型,它分别将两条微博的数据映射到两个特征向量上,然后将特征向量串联并加一个logistic回归层,输出它们来自同一个用户的概率。这种模型的训练数据是一对对的微博。
因为这个问题是对称的,所有出路第一条微博的模型当然也能重用于处理第二条微博。所有这里我们使用一个共享的LSTM层来进行映射。
首先,我们将微博的数据转为(140,256)的矩阵,即每条微博有140个字符,每个单词的特征由一个256维的词向量表示,向量的每个元素为1 表示某个字符出现,为0表示不出现,这是一个one-hot编码。
之所以是(140,256)是因为一条微博最多有140个字符,而扩展的ASCII码表编码了常见的256个字符。原文中此处为twitter,所以对外国人而言这是合理的。如果考虑中文字符,那一个单词的词向量就不止256了。
import keras
from keras.layers import Input, LSTM, Dense
from keras.models import Model

tweet_a = Input(shape=(140, 256))
tweet_b = Input(shape=(140, 256))
若要不同的输入共享同一层,就该初始化该层一次,然后多次调用它
# This layer can take as input a matrix
# and will return a vector of size 64
shared_lstm = LSTM(64)

# When we reuse the same layer instance
# multiple times, the weights of the layer
# are also being reused
# (it is effectively *the same* layer)
encoded_a = shared_lstm(tweet_a)
encoded_b = shared_lstm(tweet_b)

# We can then concatenate the two vectors:
merged_vector = keras.layers.concatenate([encoded_a, encoded_b], axis=-1)

# And add a logistic regression on top
predictions = Dense(1, activation='sigmoid')(merged_vector)

# We define a trainable model linking the
# tweet inputs to the predictions
model = Model(inputs=[tweet_a, tweet_b], outputs=predictions)

model.compile(optimizer='rmsprop',
              loss='binary_crossentropy',
              metrics=['accuracy'])
model.fit([data_a, data_b], labels, epochs=10)
层“节点”的概念
无论何时,当你在某个输入上调用层时,你就创建了一个新的张量(即该层的输出),同时你也在为这个层增加一个“(计算)节点”。这个节点将输入张量映射为输出张量。当你多次调用该层时,这个层就有了多个节点。其下标分别为0,1,2….
在上一版本的keras中,你可以通过layer.get_output()方法来获得层的输出张量,或者通过layer.output_shape获得其输出的张量的shape。这个版本的Keras你仍然可以这么做(除了layer.get_output()被out()替换)。但如果一个层与多个输入相连,会出现什么情况呢?
如果层只与一个输入相连,那没有任何困惑的地方。.output将会返回该层唯一的输出
a = Input(shape=(140, 256))

lstm = LSTM(32)
encoded_a = lstm(a)

assert lstm.output == encoded_a
但当层与多个输入相连时,会出现问题
a = Input(shape=(140, 256))
b = Input(shape=(140, 256))

lstm = LSTM(32)
encoded_a = lstm(a)
encoded_b = lstm(b)

lstm.output
上面这段代码就会报错
>> AssertionError: Layer lstm_1 has multiple inbound nodes,
hence the notion of "layer output" is ill-defined.
Use `get_output_at(node_index)` instead.
通过下面这张调用方式即可解决
assert lstm.get_output_at(0) == encoded_a
assert lstm.get_output_at(1) == encoded_b
对于input_shape和output_shape也是一样,如果一个层只有一个节点,或所有的节点都有相同的输入或输出shape,那么input_shape和output_shape都是没有歧义的,并也只返回一个值。但是,例如你把一个相同的Conv2D应用于一个大小为(3,32,32)的数据,然后又将其应用于一个(3,64,64)的数据,那么此时该层就具有了多个输入和输出的shape,你就需要显式的指定节点的下标,来表明你想取的是哪个了
a = Input(shape=(3, 32, 32))
b = Input(shape=(3, 64, 64))

conv = Conv2D(16, (3, 3), padding='same')
conved_a = conv(a)

# Only one input so far, the following will work:
assert conv.input_shape == (None, 3, 32, 32)

conved_b = conv(b)
# now the `.input_shape` property wouldn't work, but this does:
assert conv.get_input_shape_at(0) == (None, 3, 32, 32)
assert conv.get_input_shape_at(1) == (None, 3, 64, 64)